Saturday, August 27, 2022

How to return More than One Parameter from Apex to the Flow

In this blog, we'll walk through a simple example of How to return More than One Parameter from Apex to the Flow.

In this example we will pass the recordId of the contact from the flow to the apex then on the basis of this recordId we will fetch the contact record associated with this Id. And then after we will return some fields of this contact like first name, last name, phone, email to our flow and after that we will display these return values on the screen at the end of the flow .For which we will create some variables in the flow which will store these values.


From Setup, in the Quick Find box, enter Flows, select Flows, and then click New FlowSelect the flow type as "Screen Flow", then click Next.

Click the "New Resource" button in the Flow builder. Select Resource Type as 'Variable'. Give the api Name as 'recordId'. Select data type as 'Text'. In the Availability Outside the Flow options selects the checkbox 'Available for Input'. 


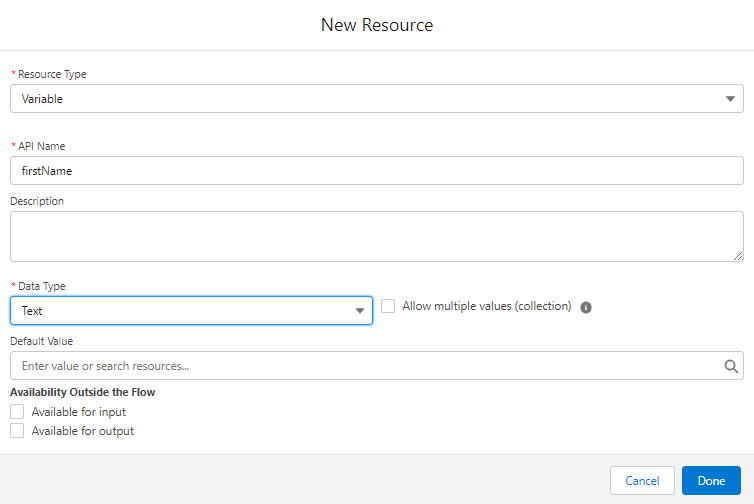
Click the "New Resource". Select Resource Type as 'Variable'. Give the api Name as 'firstName'. Select data type as 'Text'. 


Click the "New Resource". Select Resource Type as 'Variable'. Give the api Name as 'lastName'. Select data type as 'Text'.


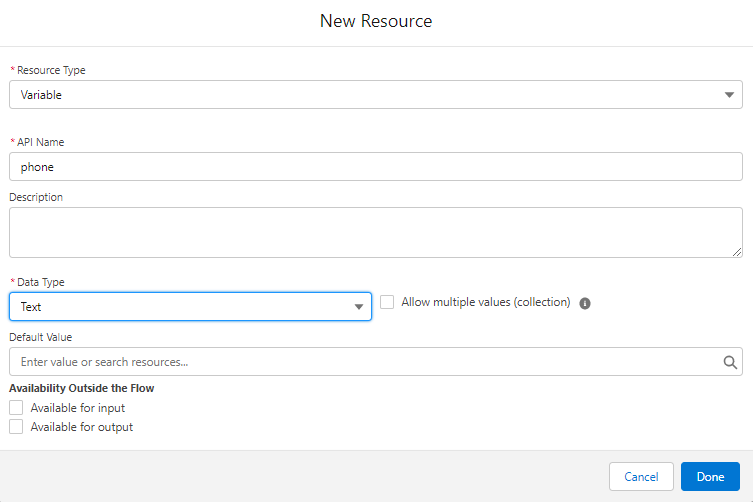
Click the "New Resource". Select Resource Type as 'Variable'. Give the api Name as 'phone'. Select data type as 'Text'.


Click the "New Resource". Select Resource Type as 'Variable'. Give the api Name as 'email'. Select data type as 'Text'. 


Now Save the flow as "Return More than One Parameter from Apex-Flow".

Now the Next steps is to create create an Invocable method in the Apex class i.e.  InvokeAction.apxc that will be called through the Screen flow which will take the contact is as input and then after return the contact details like first name, last name, phone, email to our flow, as follows:


public class InvokeAction {
    
    public class FlowParamstoApex{
        @InvocableVariable(required=true)
        public string conId;
    }
    
    public class ApexReturnParamstoFlow{
        @InvocableVariable(required=true)
        public string confirstName;
        
        @InvocableVariable(required=true)
        public string conlastName;
        
        @InvocableVariable(required=true)
        public string conPhone;
        
        @InvocableVariable(required=true)
        public string conEmail;
    }
    
    @InvocableMethod(callout=true label='Get Contact Details from Apex') 
    public static List<ApexReturnParamstoFlow> returnToFlow(FlowParamstoApex[] params)
    {  
       List<ApexReturnParamstoFlow> paramToFlowLst=new List<ApexReturnParamstoFlow>();
        
       List<contact> conList=[Select Id, firstName,lastName,phone,email from Contact where Id=:params.get(0).conId LIMIT 1];
       
       for(Contact con : conList)
       {
           ApexReturnParamstoFlow paramToFlow=new ApexReturnParamstoFlow();
           paramToFlow.confirstName=con.FirstName;
           paramToFlow.conlastName=con.LastName;
           paramToFlow.conEmail=con.Email;
           paramToFlow.conPhone=con.Phone;
           paramToFlowLst.add(paramToFlow);
       }
        
       return paramToFlowLst;
    }
}


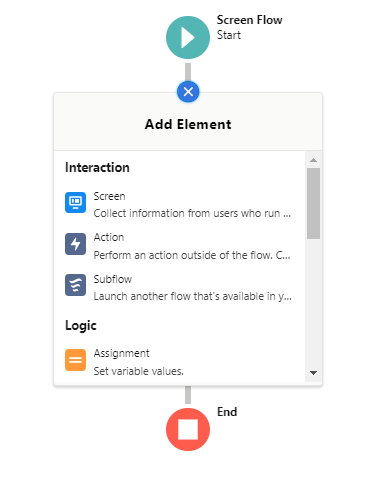
Go back to your flow and refresh the Page. To call the Apex class from the flow, we have to add an Apex action to our as shown in the image below:

From the flow Interaction, click on Action:


After this from the Apex Action search for your action by the label that we have provided in the apex class and once found click on that Action.


After this we have to give the label. Give as you want.
          
        Set Input Value for conId{!recordId}     

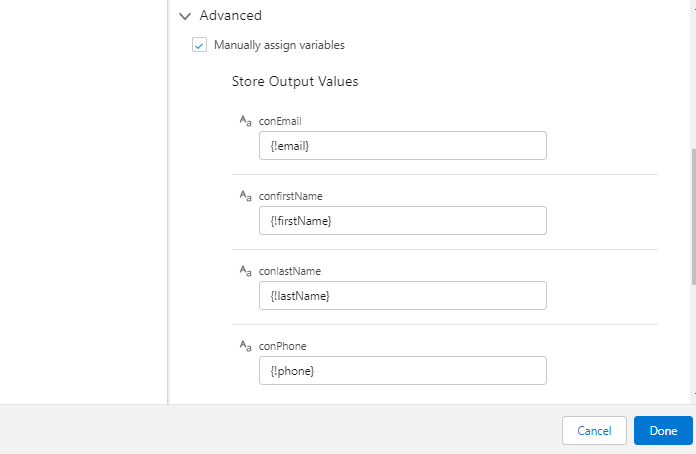
       Click on Advanced Section and Enable the checkbox Manually assign variables
         
To store Output Values we have created some variable at the beginning so we have to use those variables to store the values returned from the apex.
         
        Set Output Values for:
                   conEmail : {!email}
                   confirstName : {!firstName}
                   conLastName : {!lastName}
                   conPhone{!phone}
        
    And then Click Done Button.


Now we have to  Add the Screen to display the Contact information. For this add a screen element to the flow:-
                   Give any Label and apiName will be autoPopulated:


                   Add a display text component to this Screen
                                              
          
    Next Step is to Activate this Flow. Now we are almost done with are our work, Only one step is left that is Creating a Quick action on Contact Object and calling our flow from this quick action and add this quick action to Contact page layout or to test click on debug flow and pass any contact recordId from the contact Records. 


  Now we are ready to test our functionality:


We hope that you find this blog helpful, if you still have queries, don’t hesitate to contact us at omsfdc91@gmail.com.


Friday, August 26, 2022

Use Record Collection Variable to Bulkify the Flow


In this blog, we will try to understand how to create Record Collection variables, create a loop, set values via assignments, add a loop record to a collection, and handle DML (database actions) outside of the loop in a flow.

As a multi-tenant environment, Salesforce has various governor constraints that apply to both code and automation. The DML actions (get, edit, create, or delete) should always be carried out outside of your loop to prevent exceeding the governor restrictions. Use the loop's assignment element to accomplish this. At the end of the loop, perform the action for all the records at once.

As we know, Flow is the only automation tool that can perform actions on a group of records. Collections are a list of records or values on which you want to work. A loop element is usually required to perform operations on each item in the collection.

Collection Variable:-


A collection variable is a list of records on which you want to perform an action. A loop stores the values of the current record in the collection in a loop variable. When the loop has finished processing one loop record, Salesforce inserts the next record into the loop variable. Add the loop record variable as a record to a new collection variable to track changes made along the loop path.

Use Case:  
Bertah is the system administrator at Trident Fasteners. Rahul Yadav is the Director of Operations. He would like to automatically update Opportunities whose Stage Name is 'Qualification' and Closed Date is 'Today' and set the Stage Name to 'Closed Lost'. 

Solution: 
Getting the Opportunities records that have the status is 'Qualification' and Closed Date is 'Today'  and taking action on those records.
      
 The end result is as follows:


Steps: 

From Setup, in the Quick Find box, enter 
Flows, select Flows, and then click New FlowSelect the flow type as "Autolaunched Flow", then click Next.       

Click the "New Resource" button in the Flow builder. Select Resource Type as 'Variable'. Give the api Name as 'oppRecordCollection'. Select data type as 'Record'. Object as 'Opportunity' and Enable the checkbox Allow multiple values (collection).Click Done.


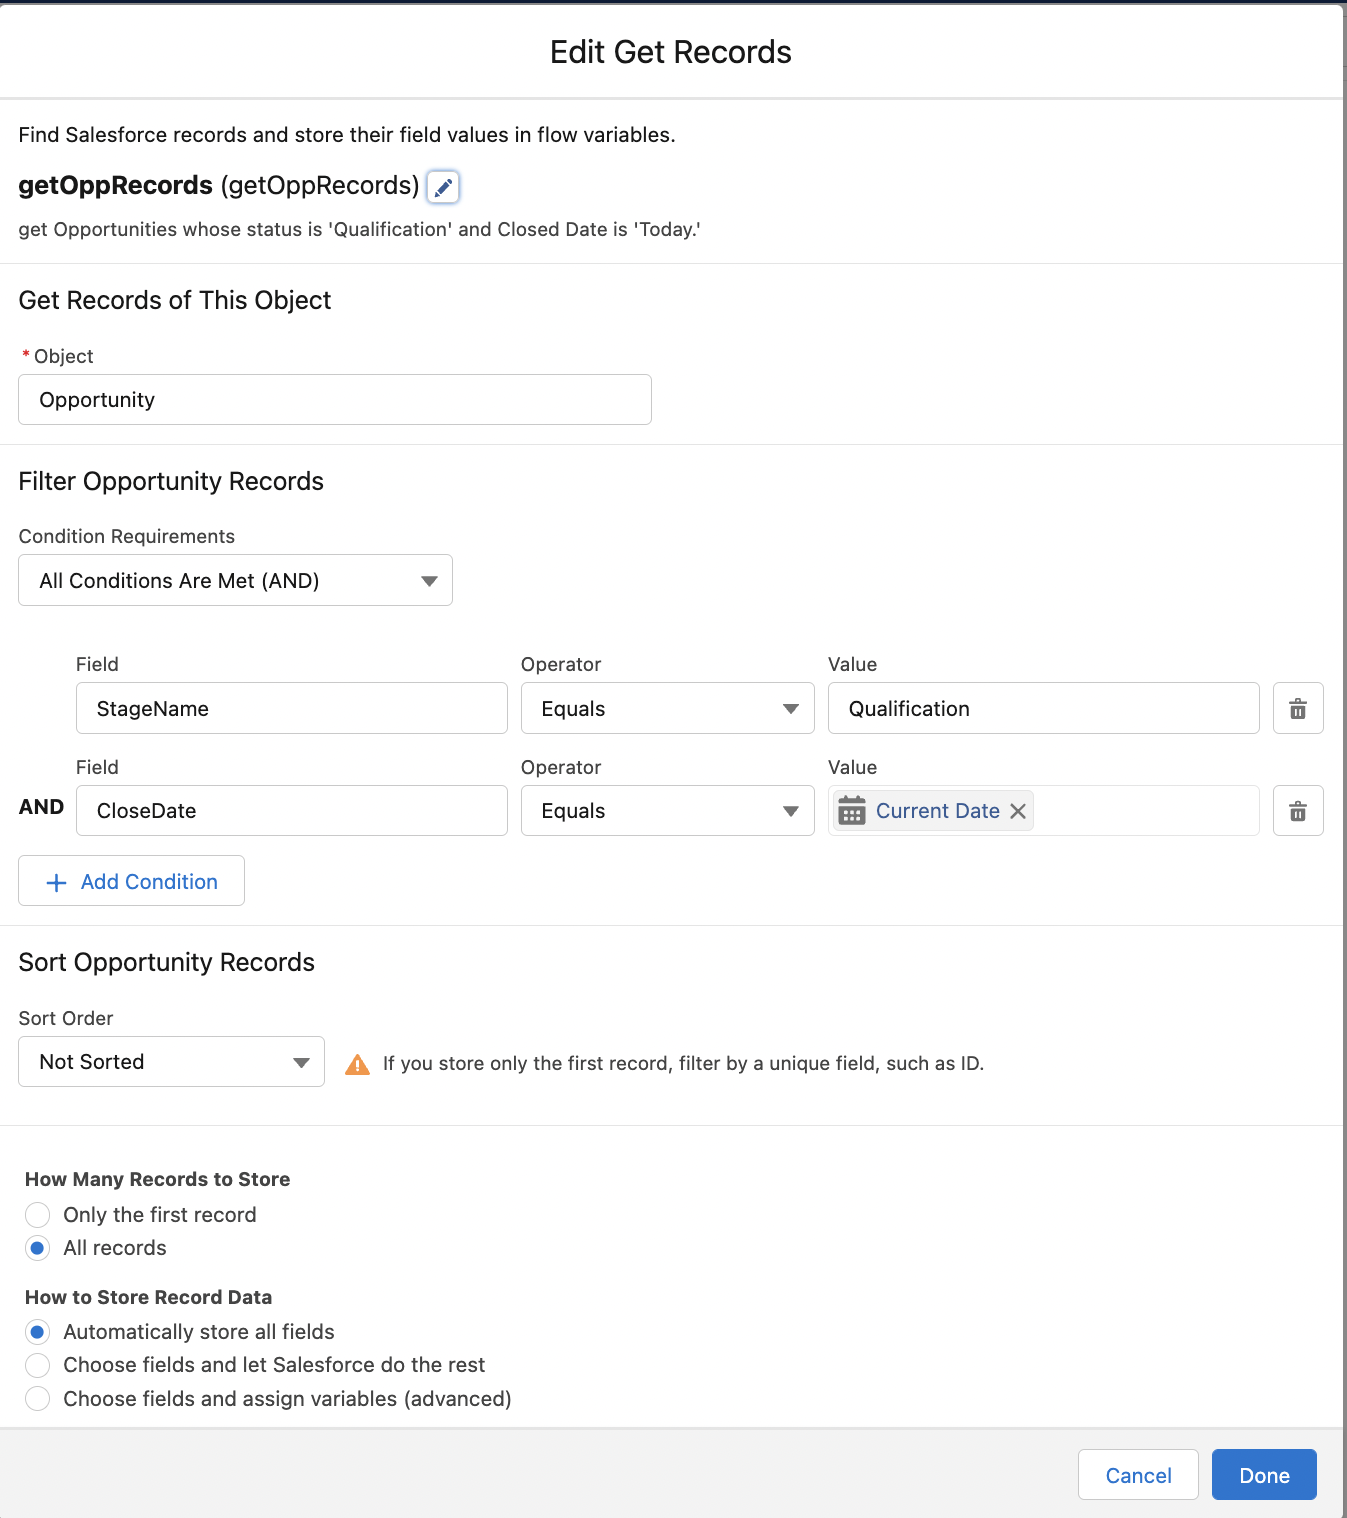
Next, we'll use the Get Records flow element to query the Opportunity object for all records whose stage name is 'Qualification' and Closed Date is 'Today'.

Object: Opportunity
Filtering the Opportunity Records by Stage name  Equals Qualification and Closed Date is Today.
How many records to store: All records
For the “How to Store the Data” option, I chose to use “Automatically store all fields.”
Next Step is to determine whether records were found in the previous step or Not. So for this use the Decision element.

{!getOppRecords} isNull {!$GlobalConstant.False}

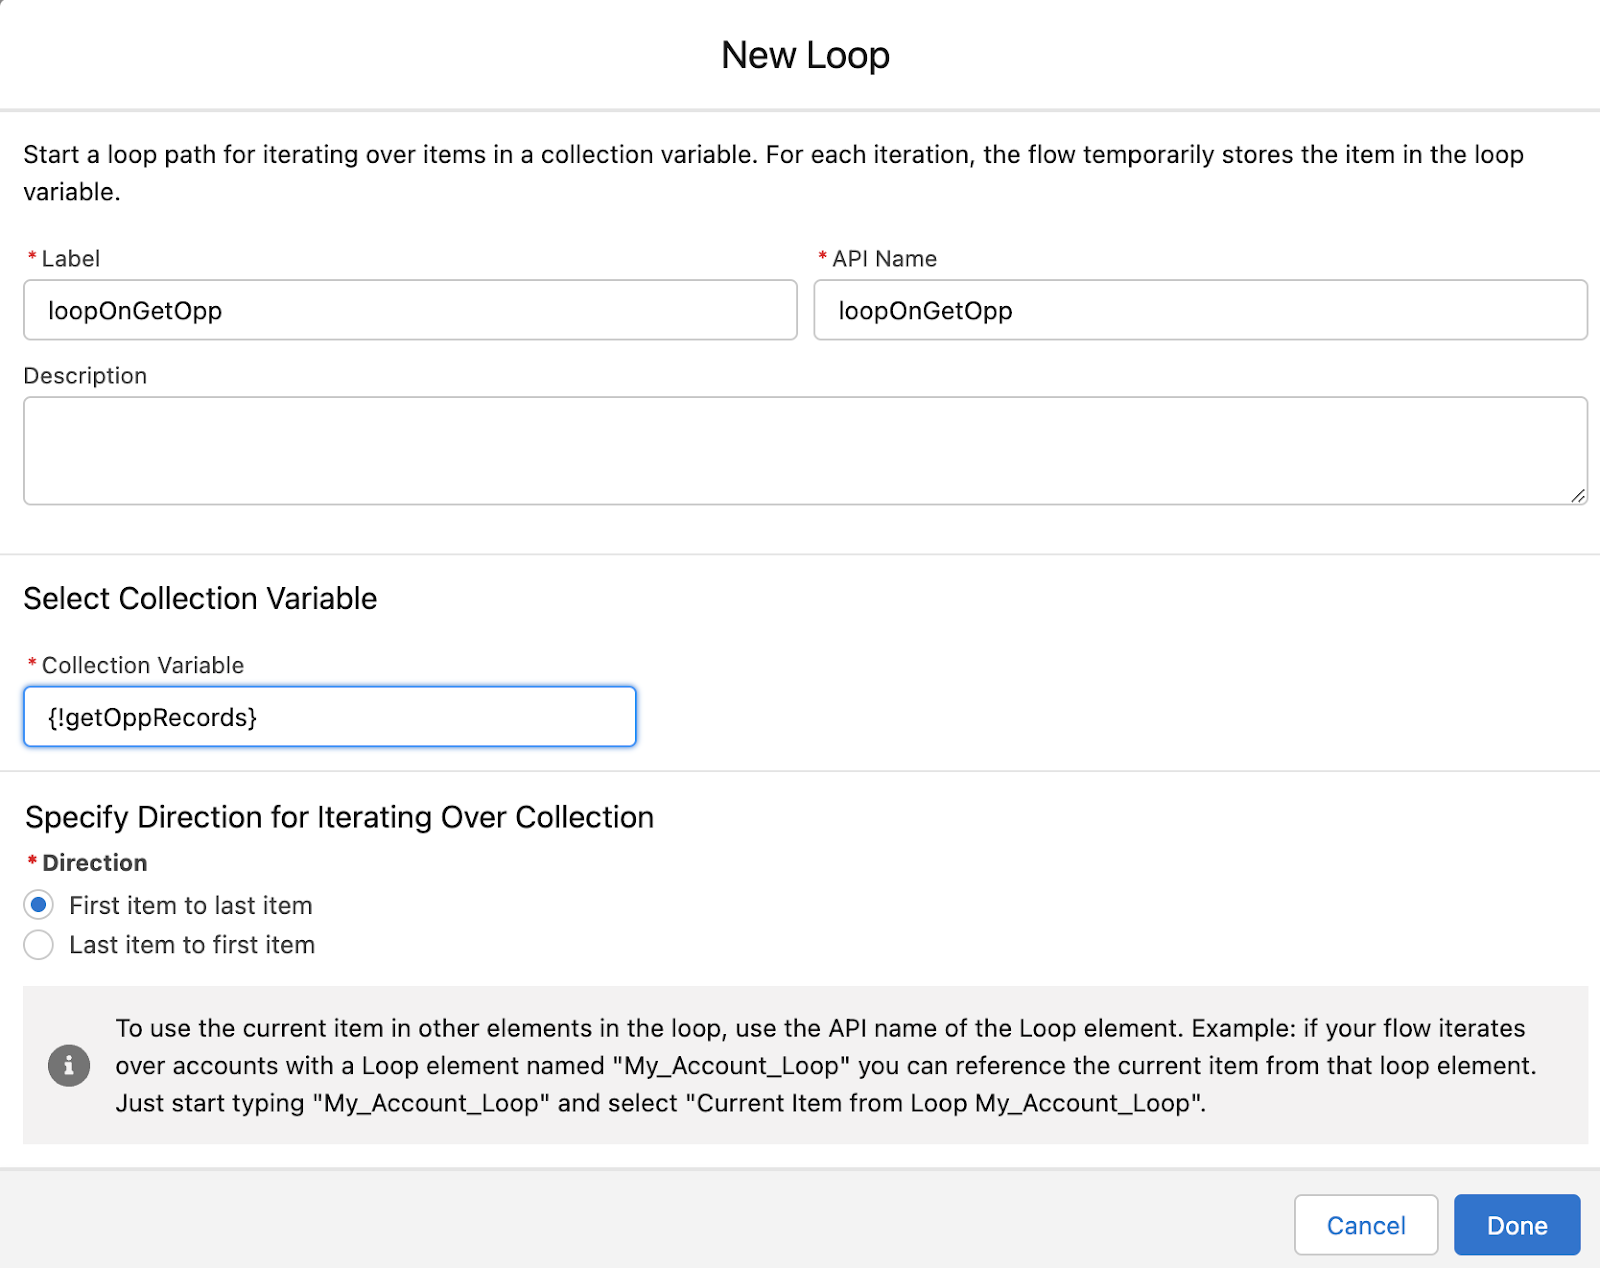
If the Decision elements founds the Opportunity Records means satisfied the Outcomes as Yes. We now need a Loop flow element which will take each record in the getOppRecords record collection variable to iterate through. Else do Nothing.


Next we have to use Assignment Element to assign values to the field that we will update in this flow i.e. set the Stage Name to 'Closed Lost'.

{!loopOnGetOpp.StageName} equals Closed Lost


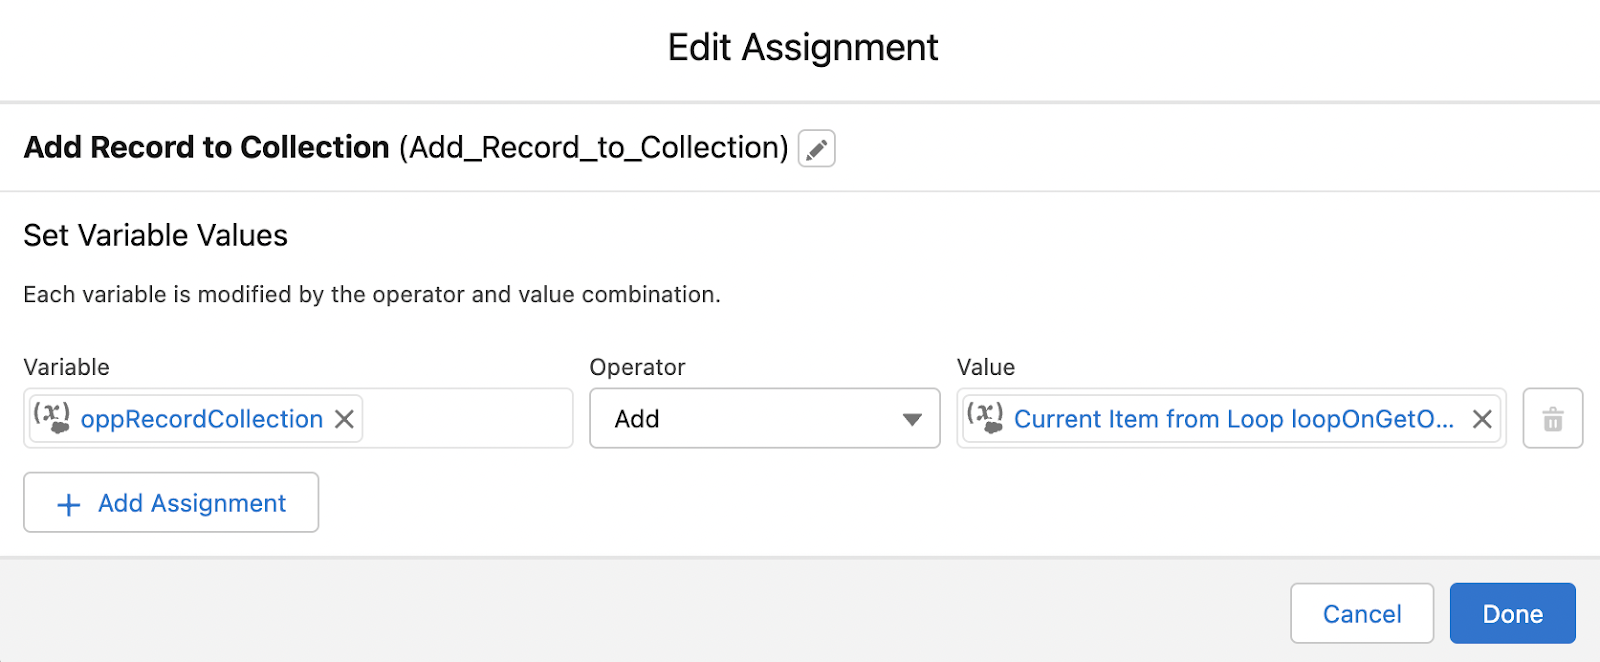
We need one more Assignment Element to add loop record to our Record Collection variable i.e. oppRecordCollection. 


{!oppRecordCollection} add {!oppRecord}

Now we want to update all the records in the collection {!oppRecordCollection} with an Update Records flow element


Now Save the flow and Activate it.

This flow can be configured as a scheduled flow, invoked by a process, or triggered by a button. This blog post will not go into detail about the initiation. Remember to test your configuration changes.

  • Make a few Opportunities with the stage name Qualification and a deadline of Today.
  • Start the flow.
  • Check to see if the Opportunities have been updated (StageName as Closed Lost).

We hope that you find this blog helpful, if you still have queries, don’t hesitate to contact us at omsfdc91@gmail.com.


Call an APEX Class from a Screen-Flow

Salesforce has advanced programming by introducing Flows, which allows users to configure complex flows in a matter of minutes. However, comfort has its drawbacks, as there are some limitations to what a Flow can do.

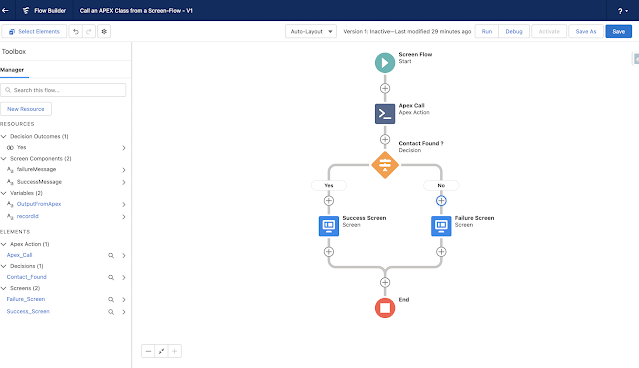
In this blog, we'll walk through a simple example of how to call an Apex class from a Screen Flow. In this example, we've created a Screen Flow with two variables, one is recordId, set as available for Input and another one is OutputFromApex.


In this example we are creating a screen flow. Then we have created a quick action in the Account object and then in this quick action we call our screen flow. Now because we have created a variable i.e recordId in screen flow. This variable will pick up the recordId from the account record. Now what we are trying to achieve from this screen flow is that, if the count of contacts associated with the account record is zero, then we should show on the screen of flow that "No contacts were Found" and if it founds, then show on the screen of flow that the "Contacts were Found". For this we will give this recordId as an input parameter in our Apex Action. Then our Apex will find the List of Contacts on the basis of this recordId. If the size of the list of contacts is more than zero, then we will return 'Contact Found' to our flow else if it not found then we will return 'Not Found' and display this message in our Screen Flow.

From Setup, in the Quick Find box, enter Flows, select Flows, and then click New Flow.
Select the flow type as "Screen Flow", then click Next.

Click the "New Resource" button in the Flow builder. Select Resource Type as 'Variable'. Give the api Name as 'recordId'. Select data type as 'Text'. In the Availability Outside the Flow options selects the checkbox 'Available for Input'. 


Create one more variable "OutputFromApex". Select data type as 'Text' to store the output that we are getting from apex.


Save the flow as "Call an APEX Class from a Screen-Flow".

Now we need to create an Invocable method in the Apex class i.e.  InvokeFlowAction.apxc that will be called through the Screen flow to return the status Contact Found or Not for a specific account record, as follows:

   public class InvokeFlowAction {

    public class FlowParams{

        @InvocableVariable(required=true)

        public string acctId;

    }

    @InvocableMethod(callout=true label='Get Account RecordId Through Flow')  

    public static List<String> passQuoteData(FlowParams[] params)

    {  

       List<string> strList=new List<string>();

       List<contact> conList=[Select Id from Contact where AccountId=:params.get(0).acctId];   

       if(conList.size()>0)

           {

             strList.add('Contact Found');

           }

       else

           {

              strList.add('Contact Not Found');

            }

       return strList;

    }

}


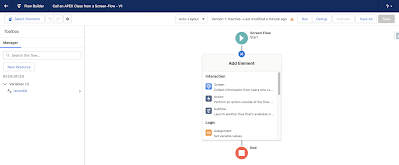
Meanwhile, to call the Apex class from the flow, we have to add an Apex action to our as shown in the image below:

From the flow Interaction, click on Action:


After this from the Apex Action search for your action by the label that we have provided in the apex class and once found click on that Action.


After this give the label as you want and set the input parameter i.e. acctId value and return value that we are getting from apex to the variables that we have created in the flow.


The Next Step is to add the Decision element to decide what output we are getting from our Apex class.

Now Add the Screen to display the information Contact found or Not Found to the User.

 Note: We are using "OutputFromApex" variable  as  a resource to display the message. Because this   variable is holding the output that we are getting from Apex.
     
     Screen: If Contact Found-


    Screen: If Contact Not Found-


Next Step is to Activate this Flow. Now we are almost done with are our work, Only one step is left that is Creating a Quick action on Account Object and calling our flow from this quick action and add this quick action to account page layout. 


   Now we are ready to test our functionality:


We hope that you find this blog helpful, if you still have queries, don’t hesitate to contact us at omsfdc91@gmail.com.


Thursday, August 4, 2022

Generate PDF in LWC using third party JavaScript libraries

We can use third-party JavaScript libraries with Lightning web components. For example, we can use a library with interactive charts and graphs or a library that reduces code complexity.


Steps to be followed:


  1. Download the library from the third-party library's site.

  2. Upload the library to your Salesforce organization as a static resource, which is a Lightning Web Components content security policy requirement.

  3. In a JavaScript class that extends LightningElement:\n

  • Import the library by its static resource name.

import resourceName from'@salesforce/resourceUrl/resourceName';

For example, if you named the static resource myLib:

import myLib from '@salesforce/resourceUrl/myLib';


  • Import methods from the platformResourceLoader module.
    import { loadStyle, loadScript } from 'lightning/platformResourceLoader';

4.  Load the library and call its functions in a then() method.

    loadScript(this, myLib + '/myLib.js').then(() => {

    let result = myLib.myFunction(2,2);

    });

    What we are trying to achieve:- 


Steps taken to achieve this functionality are mentioned below : 


Step 1:-  Save the JS library as static resource in your org as shown below : 


               and That's it....